博客性能优化:续
去年写过一篇文章《博客性能优化》。 网站搬迁之后,需要重新优化一下。下面的测试结果都来自 webpagetest。
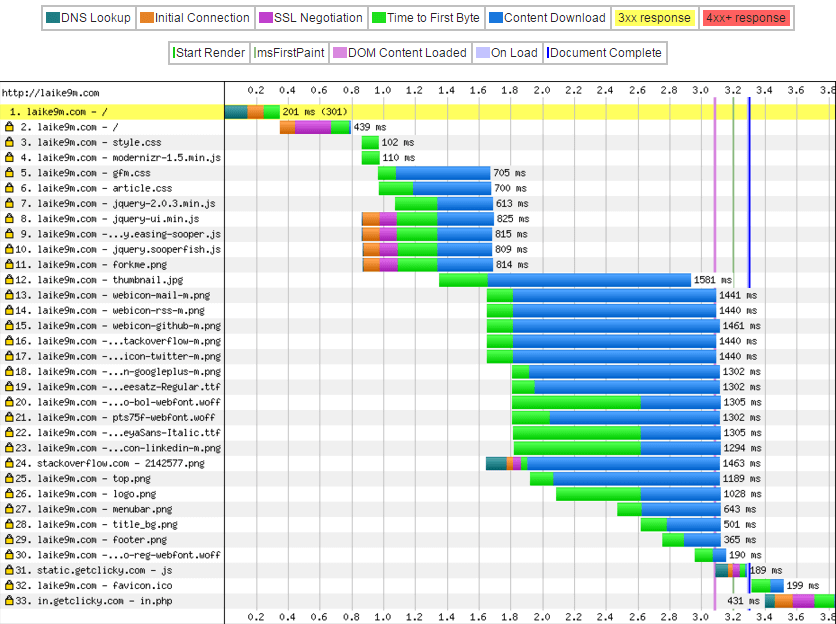
优化之前
对字体开启压缩
按照 FONT MIME TYPES IN NGINX 这篇文章里说的,在 Nginx 的 mime.types 文件中加入下面几行:
font/ttf                      ttf;
font/opentype                 otf;
application/font-woff         woff;
application/vnd.ms-fontobject eot;
在 nginx.conf 的 gzip 类型中添加
gzip_types [...] font/ttf font/opentype application/vnd.ms-fontobject image/svg+xml;
除了 woff 文件,其它的字体都可以压缩。woff 本身就是压缩过的。
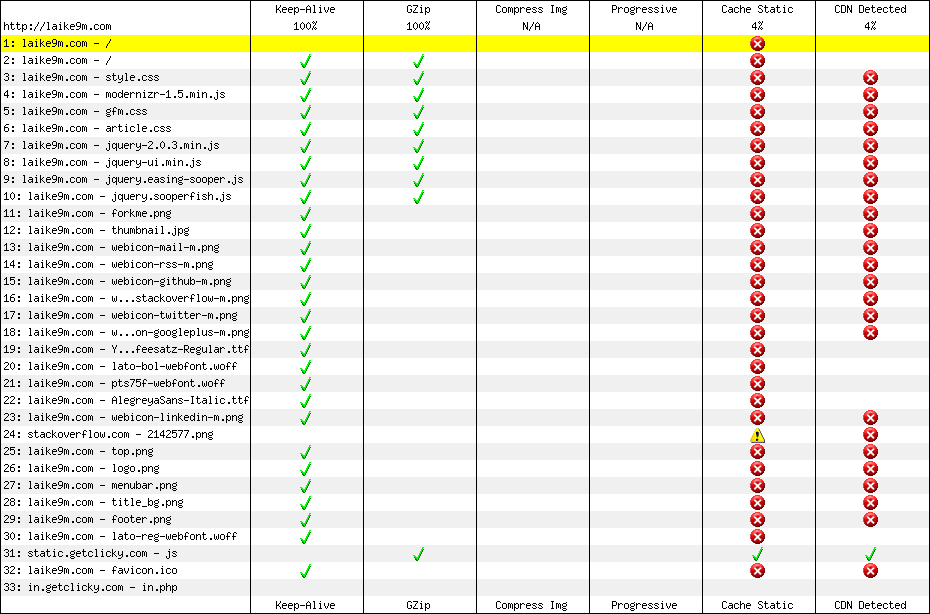
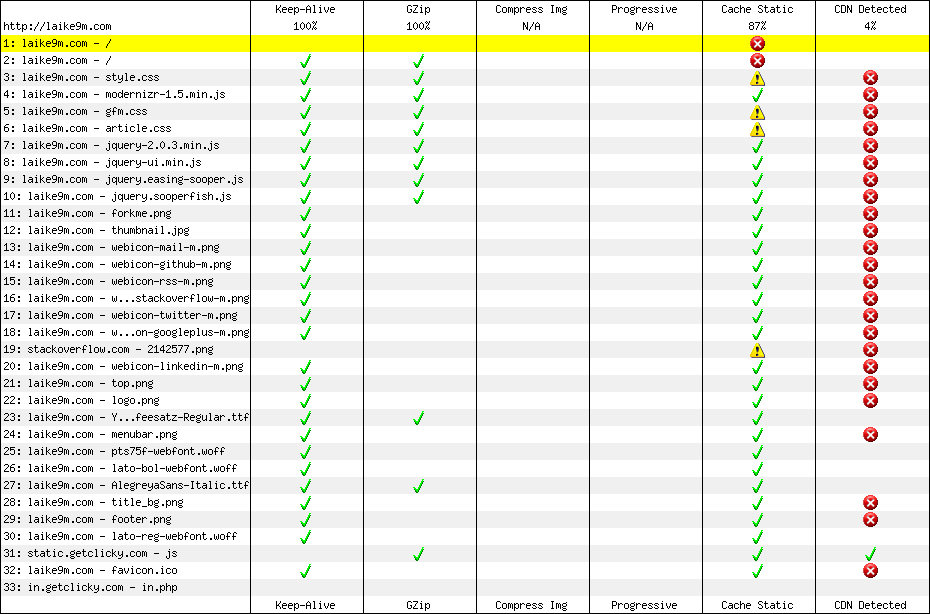
让客户端缓存静态文件
之前静态文件的配置很简单:
location /static {
    alias /home/laike9m/static;
}
完全没有客户端缓存。现在加上了:
location /static {
    alias /home/laike9m/static;
    etag on;
    expires max;
    add_header Pragma public;
    add_header Cache-Control "public";
    access_log off;
}
对 /media 作同样配置。
特别地,我希望 css 文件不要缓存那么久,因为我经常修改 css,希望第二天就能看到效果。
location ~* ^/static/(.+\.css)$ {
    alias /home/laike9m/static/$1;
    etag on;
    expires 1d;
    add_header Pragma public;
    add_header Cache-Control "public";
    access_log off;
}
这个 alias 写不对很容易就 404 了。还有就是注意要把 css 的这个 location 放在 /static 之前,因为
Nginx 在正则匹配的时候是 sequential 的,即放在前面的会先匹配,而不是像前缀匹配取最长的那个。
效果
似乎加载时间反而变长了。。。不过缓存对初次加载本来就没啥用。
开启 HTTP/2
如果不是因为想尝试 HTTP/2,我也不会写这篇文章了。Nginx 从 1.9.5 版开始正式支持 HTTP/2。
首先要重新编译 Nginx,在 configure 时加入 --with-http_v2_module。
然后安装 OpenSSL 1.0.2。官方的说法是“This is required to support the ALPN extension to TLS that our HTTP/2 implementation uses.”。
然后就发现网站没法访问了_(:3」∠)_,出现错误 ERR_SPDY_INADEQUATE_TRANSPORT_SECURITY。
找到了两篇相关文章:
Guide to Deploying Diffie-Hellman for TLS
Security/Server Side TLS
某论坛的一个回复里说
To use HTTP/2, you need to make sure cipher ECDHE-RSA-AES128-GCM-SHA256 is the first one in your cipher configuration.
首先按第一篇文章说的生成一个新的 "Diffie-Hellman group",作为 ssl_dhparam 的值。
openssl dhparam -out dhparams.pem 2048
然后复制了一个以 ECDHE-RSA-AES128-GCM-SHA256 为起始的值作为 ssl_ciphers,网站就可以工作了。
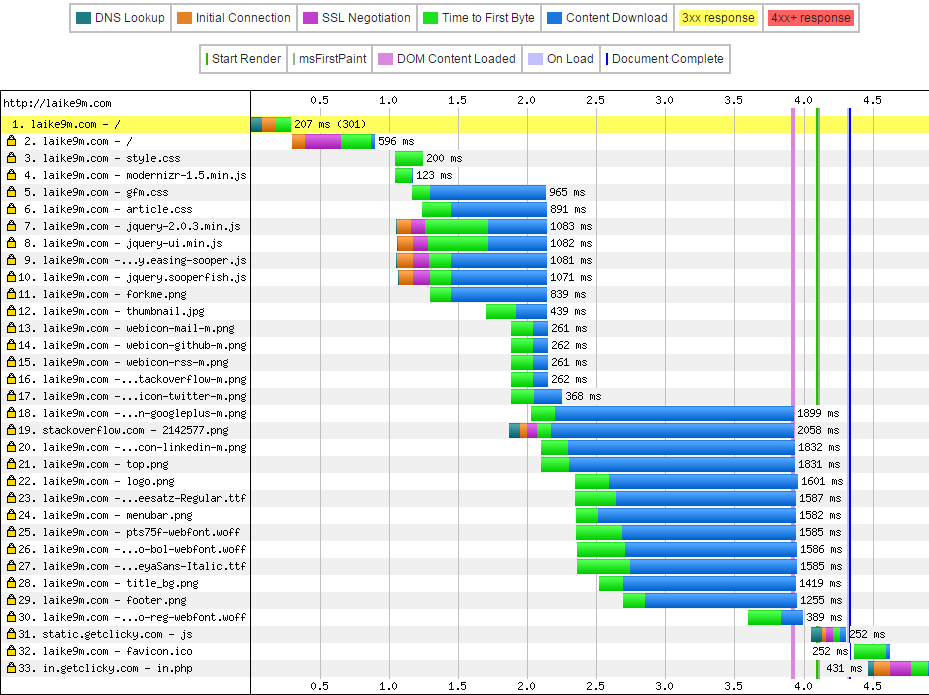
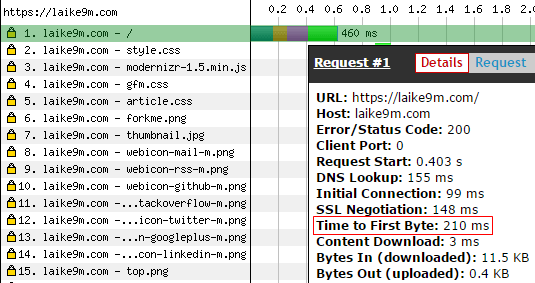
效果

HTTP/2 的 Multipexing 在这张图里体现得很明显,不会开多个连接去下载静态资源了。然而速度上似乎并没有提升。
可能的后续优化
Nginx Configuration Snippets
本博客 Nginx 配置之性能篇
另外,webpagetest 给我的 First Byte Time 这一项评分是 B。官方的解释是:
The First Byte time is the time from when the user started navigating to the page until the first bit of the server response arrived. The bulk of this time is usually referred to the "back-end time" and is the amount of time the server spent building the page for the user.
评分标准
The target time is the time needed for the DNS, socket and SSL negotiations + 100ms. A single letter grade will be deducted for every 100ms beyond the target.
这一项没有达标的原因大概是后端现在什么缓存都没开。其实原来是有用 Memcached 缓存全站,但是不够令人满意。
因为我在发布文章之后的一段时间可能会编辑文章,而加缓存之后总是要很慢才能生效。目前还在寻求更好的方法。
理想状况是最新的一篇文章永远不缓存,或者是更新文章之后让缓存失效。这些都需要更精细的代码层面的控制。
这篇文章之后应该还会更新。
2015.10.20
添加 OCSP Stapling
引用 JerryQu 的说法
浏览器可能会在建立 TLS 连接时在线验证证书有效性,从而阻塞 TLS 握手,拖慢整体速度。OCSP stapling 是一种优化措施,服务端通过它可以在证书链中封装证书颁发机构的 OCSP(Online Certificate Status Protocol)响应,从而让浏览器跳过在线查询。服务端获取 OCSP 一方面更快(因为服务端一般有更好的网络环境),另一方面可以更好地缓存。
在 nginx.conf 添加上这三行就可以了:
ssl_stapling on;
ssl_stapling_verify on;
ssl_trusted_certificate /home/laike9m/files/laike9m_com/laike9m_com.chain.crt;
ssl_trusted_certificate 所需要的 pem 文件其实就是 chained crt(问了 gogetssl 员工得知)。
2015.10.30
启用 Session Ticket
ssl_session_tickets on;
Session Ticket 和 Session Cache 一样,也是简化 TLS 握手的方案。我不是很清楚在服务器都支持的情况下浏览器会选择哪一种。
修改 ssl_buffer_size
关于 ssl_buffer_size,Nginx 文档是这么解释的:
Sets the size of the buffer used for sending data.
By default, the buffer size is 16k, which corresponds to minimal overhead when sending big responses. To minimize Time To First Byte it may be beneficial to use smaller values, for example:
ssl_buffer_size 4k;
然而到底设成多少比较好,网上找不到相关的说明/测试。在 Is TLS fast yet 里 Ilya Grigorik 把这个值设成了 1400:
ssl_buffer_size 1400; # 1400 bytes to fit in one MTU
然后我也学着设成了 1400。不严谨的测试结果表明,TTFB 确实减小了,但是总的 download time 增大了一点。
开启 tcp_nopush + tcp_nodelay + sendfile
sendfile        on;
tcp_nopush      on;
tcp_nodelay     on;
这篇文章详细讲了为什么要这么配置。简单来说就是 sendfile on 启用了 sendfile(2) 这个系统调用,相比 read()/write() 有诸多优点;tcp_nopush 和 tcp_nodelay 结合起来保证充分利用 MTU 的同时还能尽快地把数据包发出去而不等 0.2s。
2015.11.1
压缩 png/jpg
神器 tinypng.com。
减小 favicon.ico 的大小
原来的 favicon.ico 竟然有 30KB。上网一查才知道,ico 其实就是多层未压缩的 bmp。本来想用 Photoshop 编辑,但是居然打不开。安了一个插件之后能打开了,然而编辑功能简直糟糕,多图层都没法显示。好在找到一枚神器 IcoFX,花钱买了正版。
按照这篇文章讲的,删掉了 64*64,24 * 24 两个图层。保留 32 * 32 是因为 Disqus 的站点缩略图可能要用。颜色也没有换成 4bit,仍然保留 8bit 256 色,毕竟已经减到 3KB 了。
2015.12.5
参照 sendfile 官方文档加上了 aio on:
aio can be used to pre-load data for sendfile()
然后我无意之中发现,sendfile on 和 gzip on 无法同时起作用,来自官方的《Tuning NGINX for Performance》 一文:
Note, however, that because data copied with sendfile() bypasses user space, it is not subject to the regular NGINX processing chain and filters that change content, such as gzip. When a configuration context includes both the sendfile directive and directives that activate a content-changing filter, NGINX automatically disables sendfile for that context.
因为 sendfile on 使用的是系统调用 sendfile(2),实现了 zero-copy,文件内根本就不会被拷贝到用户态(“bypasses user space”),因此 Nginx 无法进行压缩处理。
上网查了一下,唯一既能利用 zero-copy 又能利用 gzip 压缩的方案是启用 gzip_static。这个功能并非开箱即用,而是要求使用者先把文件压缩好,这样 Nginx 才能找到,如果没找到,就 fall back 回普通的 gzip。因为比较麻烦,这次先不弄了。计划是添加一个 Django command 实现原来指定 gzip 压缩的那些格式的文件。几个可能有用的链接:
Gzip per request vs static gzip 比较两种 gzip 方式
Nginx Performance Tuning 对于 gzip_static 讲得比官方文档清楚
Nginx中gzip_static模块的使用 使用 gzip_static 的一些注意事项
还有把 gzip_comp_level 从 6 改成了 9,提高压缩的程度,代价是更消耗 CPU,不过感觉 CPU 用的不多,所以无所谓。
